Removing a print from your favorite football shirt can seem daunting, but with the right methods and a bit of patience, it’s entirely achievable. Whether you want to revamp an old jersey or remove a name and number, this guide offers detailed, step-by-step instructions and expert tips to help you successfully remove prints without damaging the fabric. CAUHOI2025.UK.COM is here to provide reliable and easy-to-understand solutions to your clothing customization needs.
1. Understanding the Basics of Print Removal
Before diving into the methods, it’s crucial to understand the types of prints commonly used on football shirts. These include:
- Screen Printing: Durable but can crack over time.
- Heat Transfer Vinyl (HTV): Applied with heat and pressure, often used for names and numbers.
- Sublimation: Dyes the fabric, making it nearly impossible to remove completely.
Knowing the print type will guide your choice of removal method. Always test any method on a small, inconspicuous area of the shirt first to ensure it doesn’t damage the fabric.
2. Removing Prints with an Iron: A Heat-Based Method
Using an iron is a popular and effective way to remove prints, especially HTV. The heat softens the adhesive, making it easier to peel off.
2.1. Step-by-Step Guide To Removing Print on Shirt with an Iron:
Follow these steps for the best results:
- Prepare Your Materials: Gather your football shirt, an iron, a pressing cloth (such as a clean cotton towel), and a pair of tweezers or a seam ripper.
- Set the Iron to Low Heat: Start with a low heat setting to avoid scorching the fabric. Increase the heat gradually if needed. According to the University of Delaware’s Fashion and Apparel Studies Department, using too high of a temperature can damage synthetic fibers commonly found in sports apparel.
- Place the Pressing Cloth: Put the pressing cloth over the printed area. This protects the fabric from direct heat and prevents the print from sticking to the iron.
 Ironing shirt
- Apply Heat: Iron over the pressing cloth in a circular motion for 30-60 seconds. The heat will soften the adhesive.
- Peel Off the Print: Use tweezers or a seam ripper to gently lift an edge of the print. If it comes off easily, continue peeling slowly. If not, reapply heat.
- Remove Residue: After removing the print, some adhesive residue may remain. Use a clean cloth dampened with rubbing alcohol to gently rub away the residue.
- Wash the Shirt: Wash the shirt inside out in cold water to remove any remaining residue and prevent damage to the fabric.
2.2. Useful Tips for Using an Iron:
- Use a Teflon Sheet: Instead of a pressing cloth, a Teflon sheet provides better heat distribution and prevents sticking.
- Avoid Steam: Do not use the steam setting on your iron, as moisture can interfere with the adhesive softening process.
- Work in a Well-Ventilated Area: Some adhesives may release fumes when heated, so ensure good ventilation.
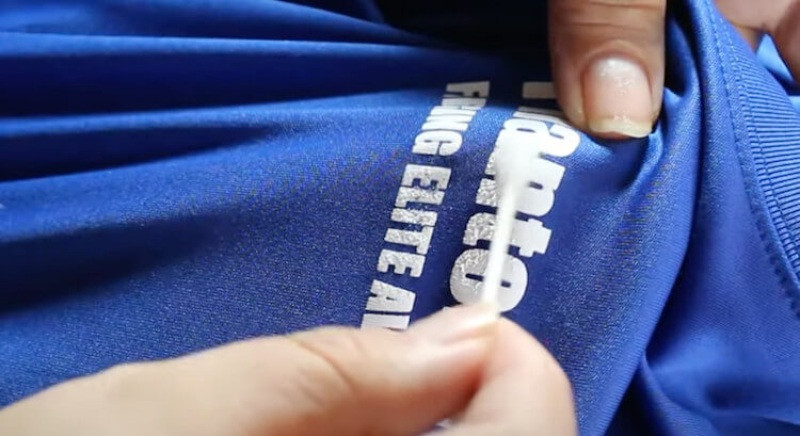
3. Nail Polish Remover or Acetone: A Chemical Solution
Acetone, the active ingredient in many nail polish removers, is a powerful solvent that can dissolve certain types of prints. However, it should be used with caution, as it can damage some fabrics.
3.1. Step-by-Step Guide to Getting Print Off a Shirt with Nail Polish Remover or Acetone:
- Test on a Hidden Area: Before applying acetone to the print, test it on a small, hidden area of the shirt, such as an inside seam, to ensure it doesn’t cause discoloration or damage.
- Protect Your Work Surface: Place a clean towel or cloth underneath the area you’ll be working on to protect your surface.
- Apply Acetone: Turn the T-shirt inside out and apply acetone on the backside of the fabric. Make sure to apply an amount that is enough to soak the entire printed area.
Ironing shirt
- Wait for Dissolution: Wait for the acetone to soak in and dissolve the print. Slightly stretch the fabric out to make acetone work faster.
- Flip and Peel: Flip the T-shirt back and start peeling and scraping off the printing.
- Repeat if Necessary: If the print is not entirely dissolved or peeled off the fabric, repeat the entire process again.
- Wash Thoroughly: After removing the print, wash the shirt immediately in cold water to remove all traces of acetone.
3.2. Useful Tips for Using Acetone:
- Ventilation is Key: Work in a well-ventilated area, as acetone fumes can be strong and harmful. According to the Environmental Protection Agency (EPA), prolonged exposure to acetone can cause respiratory irritation and other health issues.
- Use Sparingly: Apply acetone sparingly to avoid soaking the fabric and potentially spreading the solvent to other areas.
- Avoid on Delicate Fabrics: Do not use acetone on delicate fabrics like silk or rayon, as it can cause irreversible damage.
4. Alternative Solvents: Exploring Other Options
If acetone is too harsh or unavailable, several alternative solvents can be used to remove prints from football shirts.
4.1. Step-by-Step Guide to Using Alternative Solvents:
- Gather Supplies: You’ll need rubbing alcohol, adhesive remover, or a specialized print removal solvent, along with a clean cloth and a soft brush.
- Test the Solvent: Before applying the solvent to the print, test it on a small, hidden area of the shirt, such as an inside seam, to ensure it doesn’t cause discoloration or damage.
- Apply the Solvent: Dampen a clean cloth with the solvent and gently dab the printed area. Allow the solvent to sit for a few minutes to soften the print.
- Rub and Peel: Use a soft brush or the cloth to gently rub the print. As the print dissolves, peel it away from the fabric.
- Repeat as Needed: Some prints may require multiple applications for complete removal.
- Wash the Shirt: After removing the print, wash the shirt inside out in cold water to remove any remaining solvent residue.
4.2. Useful Tips for Using Solvents:
- Check Compatibility: Always check the solvent’s compatibility with the fabric. Some solvents are designed for specific materials.
- Use Gloves: Wear gloves to protect your skin from direct contact with solvents, which can cause irritation.
- Ventilation: As with acetone, ensure good ventilation when working with solvents.
5. Plastisol Remover: A Specialized Solution for Screen Prints
Plastisol is a common ink used in screen printing. If other methods fail, a plastisol remover can be highly effective.
5.1. Step-by-Step Guide to Using Plastisol Remover:
- Read Instructions: Apply plastisol remover according to product instructions. Different products may have varying application methods, so follow the guidelines provided.
- Apply Remover: Apply the plastisol remover directly to the printed area, ensuring it’s fully saturated.
- Allow to Sit: Allow it to sit for the recommended time (mostly around 30 minutes). This step allows the remover to penetrate and soften the ink.
- Wipe Away: Wipe away the softened print with a brush and soft cloth.
- Wash the Shirt: After completely removing all the prints, you can try to wash off all the remaining plastisol and print residue by washing the clothes.
5.2. Useful Tips for Using Plastisol Remover:
- Safety First: Follow the safety precautions outlined by the product, including using gloves and working in a well-ventilated area.
- Gentle Scrubbing: Use a soft brush to gently scrub the print while it’s saturated with the remover. Avoid harsh scrubbing, which can damage the fabric.
- Check for Residue: After washing, check the shirt for any remaining plastisol residue. If necessary, repeat the process.
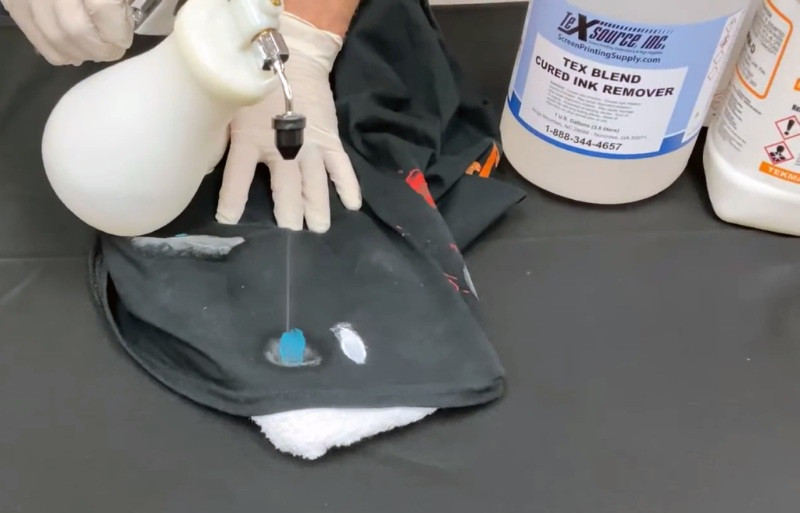
6. Spot Removal Fluid: Precision Print Removal
Spot removal fluid is designed for removing ink spots and can be effective for detailed print removal without affecting the surrounding fabric.
 Spot Removal Fluid t-shirt print
6.1. Step-by-Step Guide to Using Spot Removal Fluid:
- Prepare the Shirt: Lay the shirt flat on a clean surface and place a clean cloth or towel underneath the printed area.
- Apply Spot Removal Fluid: Use an air compressor spray to apply spot removal fluid onto the fabric.
- Blot the Area: Place a soft cloth on the backside of the fabric where the print is. Spray the spot removal fluid into the fabric. Spot removal fluids through the compressed gun will break down the print instantly. Continue to spray all over the printed area to remove printing completely.
- Clean Off Excess: Use a soft cloth to clean off the excess fluid and resolve the ink.
- Wash Thoroughly: After removing all the prints, wash the screen printed shirt again to rinse all the residues completely.
6.2. Useful Tips for Using Spot Removal Fluid:
- Test Compatibility: Check the fabric care label to ensure compatibility with spot removal fluid.
- Prompt Washing: Wash the shirt promptly after removing the print to eliminate any lingering chemical residue.
- Mask and Gloves: Be careful with the spay. Wear a mask and glove before spaying.
7. Preventing Damage During Print Removal
No matter which method you choose, preventing damage to your football shirt is crucial. Here are some general tips:
- Read the Fabric Care Label: Always check the fabric care label before attempting any print removal method. Follow the manufacturer’s instructions for washing and drying.
- Use Gentle Motions: When rubbing, scrubbing, or peeling, use gentle motions to avoid stretching or tearing the fabric.
- Avoid Abrasive Tools: Do not use abrasive tools like steel wool or sandpaper, as they can damage the fabric fibers.
- Stay Patient: Print removal can be a time-consuming process, so be patient and avoid rushing, which can lead to mistakes and damage.
8. Addressing Common Issues
Even with careful execution, you may encounter some common issues during print removal:
- Ghosting: If a faint outline of the print remains after removal, this is known as ghosting. Try using a fabric brightener or dye to even out the color.
- Discoloration: If the fabric becomes discolored, try using a color-safe bleach or a fabric dye to restore the original color.
- Fabric Damage: If the fabric is damaged, consider patching or embroidering the area to cover the damage.
9. Why Choose CAUHOI2025.UK.COM for Your Garment Care Needs?
At CAUHOI2025.UK.COM, we understand the importance of preserving your favorite garments. Our platform offers a wealth of information and expert advice on garment care, stain removal, and clothing customization. We provide reliable, easy-to-understand solutions tailored to the needs of users in the USA.
10. Call to Action
Ready to give your football shirt a new look? Visit CAUHOI2025.UK.COM for more tips and tricks on garment care and customization. Have a specific question or need personalized advice? Contact us today! Our team of experts is here to help you with all your clothing-related needs.
Contact Us:
- Address: Equitable Life Building, 120 Broadway, New York, NY 10004, USA
- Phone: +1 (800) 555-0199
- Website: CAUHOI2025.UK.COM
11. FAQ: Removing Prints from Football Shirts
Q1: Can I remove a sublimated print from a football shirt?
A1: Sublimated prints are very difficult to remove as the dye is embedded in the fabric. While some methods may lighten the print, complete removal is usually not possible.
Q2: Will removing a print damage the fabric of my football shirt?
A2: If done carefully, print removal shouldn’t cause significant damage. Always test methods on a hidden area first and use gentle motions to avoid stretching or tearing.
Q3: What’s the best method for removing a heat transfer vinyl (HTV) print?
A3: Using an iron is generally the most effective method for removing HTV prints. The heat softens the adhesive, making it easier to peel off.
Q4: Can I use a regular nail polish remover to remove prints?
A4: Yes, as long as it contains acetone. However, use it sparingly and test on a hidden area first to avoid damage or discoloration.
Q5: How do I remove adhesive residue after removing a print?
A5: Use a clean cloth dampened with rubbing alcohol to gently rub away the residue.
Q6: What should I do if the fabric becomes discolored during print removal?
A6: Try using a color-safe bleach or a fabric dye to restore the original color.
Q7: Is it safe to use plastisol remover at home?
A7: Yes, but follow the safety precautions outlined by the product, including using gloves and working in a well-ventilated area.
Q8: Can I wash my football shirt after removing a print?
A8: Yes, always wash the shirt inside out in cold water after removing a print to remove any remaining residue.
Q9: What if I don’t know what type of print is on my football shirt?
A9: Start with the gentlest method (like using an iron on low heat) and gradually increase the intensity if needed.
Q10: Where can I find more information about garment care and customization?
A10: Visit CauHoi2025.UK.COM for a wealth of information and expert advice on garment care, stain removal, and clothing customization.