Are you eager to learn How To Make A 2 Player Football Game On Scratch? This comprehensive guide will walk you through creating your own interactive football game using Scratch, a visual programming language perfect for beginners. CAUHOI2025.UK.COM provides detailed steps and creative ideas to build a fun and engaging game. Let’s get started and design your football game.
Here are the five main search intentions we’ll address:
- Step-by-step guide on creating a football game in Scratch.
- Understanding the basics of Scratch programming.
- Creating a 2-player game.
- Implementing scoring and movement mechanics.
- Enhancing the game with additional features.
1. Setting Up the Stage and Sprites
The first step in creating your football game is setting up the stage and sprites. This involves designing the football field, adding player sprites, and including a ball.
1.1. Designing the Football Field
-
Creating the Backdrop:
- Click on the “Backdrop” icon at the bottom right of the screen.
- Select “Paint” to create a new backdrop.
- Draw a green rectangle to represent the football field.
- Add white lines to mark the field boundaries and center line.
-
Adding Goals:
- Place colored rectangles at each end of the field to represent goals.
- Use different colors (e.g., blue and red) to differentiate the teams.
- Ensure the colors contrast with the pitch to make the goals easily visible.
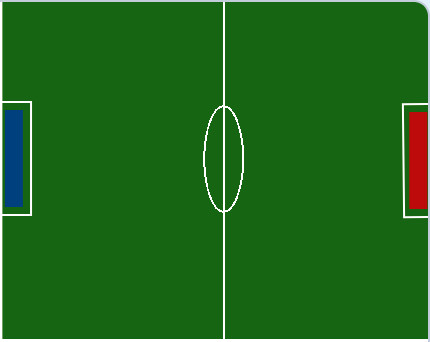 Football field with colored goals
1.2. Adding Players and the Ball
-
Creating Player Sprites:
- Draw two sprites representing the players, each corresponding to the goal colors.
- Name them “Player 1” and “Player 2.”
- You can customize the appearance of the players to make them unique.
-
Adding the Football Sprite:
- Click on the “Choose a Sprite” icon from the library.
- Select the “Soccer Ball” sprite from the “Sports” category.
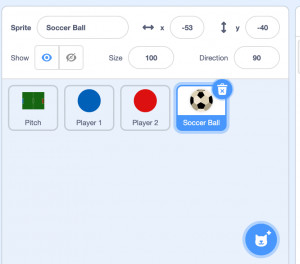 Soccer ball sprite
1.3. Positioning the Sprites
-
Initial Player Positions:
- Drag the player sprites to their starting positions near their respective goals.
- Adjust their positions to your liking.
-
Initial Ball Position:
- Place the ball sprite at the center of the field.
2. Implementing a Scoring System
A scoring system is crucial for any game. In this section, we’ll create variables to keep track of each player’s score.
2.1. Creating Score Variables
-
Creating Variables:
- Go to the “Variables” category in the code panel.
- Click on “Make a Variable.”
- Create two variables named “Player 1 Score” and “Player 2 Score.”
-
Hiding Score Variables:
- Deselect the boxes next to the variable names to hide them from the playing field.
- These variables will track the points internally.
2.2. Displaying the Score
-
Creating Display Variables:
- Create two new variables named “Player 1 Display” and “Player 2 Display”.
- Leave the boxes selected so they appear on the playing field.
-
Setting Score Positions:
- Drag the display variables to desired positions on the stage using the mouse.
3. Controlling the Players
To make the game interactive, you need to allow players to control their sprites. This involves writing scripts to move the players using keyboard inputs.
3.1. Player 1 Movement Script
-
Using WASD Keys:
- Use “when key pressed” blocks from the “Events” category.
- Set the keys to “W,” “A,” “S,” and “D” for up, left, down, and right movement, respectively.
-
Movement Code:
- Use “change y by” blocks for vertical movement (W and S keys).
- Use “change x by” blocks for horizontal movement (A and D keys).
- Adjust the values to control the speed of the players.
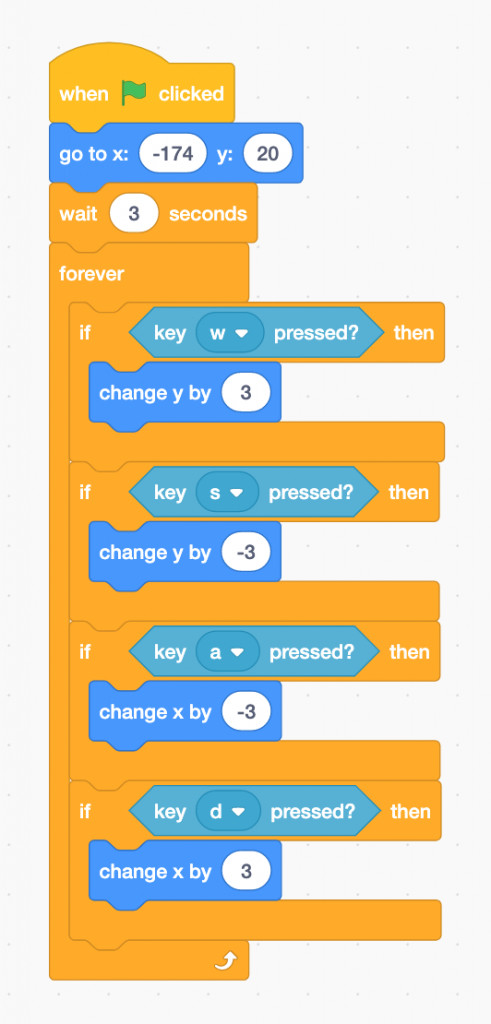 Player 1 Movement Script
3.2. Player 2 Movement Script
-
Using Arrow Keys:
- Use “when key pressed” blocks from the “Events” category.
- Set the keys to “up arrow,” “left arrow,” “down arrow,” and “right arrow” for movement.
-
Movement Code:
- Use “change y by” blocks for vertical movement (up and down arrows).
- Use “change x by” blocks for horizontal movement (left and right arrows).
- Adjust the values to control the speed of the players.
 Player 2 Movement Script
3.3. Initializing Player Positions
-
Setting Starting Positions:
- Use “when green flag clicked” blocks from the “Events” category.
- Add “go to x: y:” blocks from the “Motion” category to set the initial positions of the players.
- Adjust the coordinates to place the players near their respective goals.
-
Testing Movement:
- Click the green flag to start the game.
- Test the player movements using the WASD and arrow keys.
- Adjust the speed and starting positions as needed.
4. Creating an Introduction Message
An introduction message can enhance the user experience by providing a countdown before the game starts.
4.1. Implementing the Countdown
-
Using “say” Blocks:
- Use “when green flag clicked” blocks from the “Events” category.
- Add “say” blocks from the “Looks” category to display the countdown numbers.
-
Adding Delays:
- Use “wait” blocks from the “Control” category to create delays between the numbers.
- Set the countdown to “3…2…1…Go!”
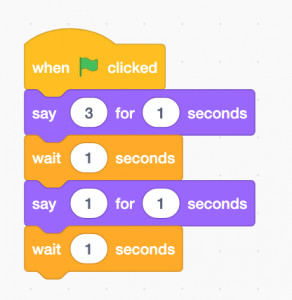 Introduction Message Script for Player 1
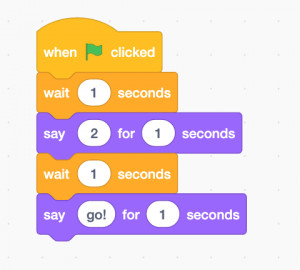 Introduction Message Script for Player 2
 -
Synchronizing Messages:
- Coordinate the “say” and “wait” blocks for both players to display the countdown simultaneously.
- For example, Player 1 says “3,” Player 2 says “2,” and so on.
5. Controlling the Ball
The ball’s movement and interaction with the players are essential for gameplay. This section covers how to control the ball’s behavior.
5.1. Initial Ball Position and Score Reset
- Positioning the Ball:
- Use “when green flag clicked” block from the “Events” category.
- Add “go to x: y:” block from the “Motion” category to set the initial position of the ball at the center of the field.
- Resetting The Score
- Set “Player 1 Score” and “Player 2 score” to zero
5.2. Ball Movement
-
Detecting Player Contact:
- Use a “forever” loop from the “Control” category.
- Inside the loop, use “if touching Player 1?” and “if touching Player 2?” blocks from the “Sensing” category.
-
Moving Towards the Player:
- If the ball is touching a player, use “point towards Player 1/Player 2” block from the “Motion” category.
- Add “move [number] steps” block to make the ball move in the direction of the player.
-
Edge Interaction:
- To prevent the ball from getting stuck, use an ‘if on edge, bounce’ block from the Motion category.
6. Counting Goals
Registering goals and updating the score is crucial for tracking progress in the game.
6.1. Detecting Goal Contact
-
Using “touching color” Blocks:
- Use a “forever” loop from the “Control” category.
- Inside the loop, use “if touching color [goal color]?” blocks from the “Sensing” category to detect when the ball touches a goal.
-
Setting Goal Colors:
- Use the eyedropper tool to select the exact colors of the goals in the “touching color” blocks.
6.2. Updating the Score
-
Incrementing the Score:
- If the ball touches the red goal, use “change Player 1 Score by 1” block from the “Variables” category.
- If the ball touches the blue goal, use “change Player 2 Score by 1” block from the “Variables” category.
-
Displaying the Score:
- Update “Player 1 Display” and “Player 2 Display” to equal “Player 1 Score” and “Player 2 Score” respectively.
-
Resetting the Ball:
- After a goal, use “go to x: y:” block from the “Motion” category to reset the ball to the center of the field.
-
Announcing the Goal:
- Add “say ‘Goal!'” block from the “Looks” category to announce the goal.
- Use “wait” block to display the message for a few seconds.
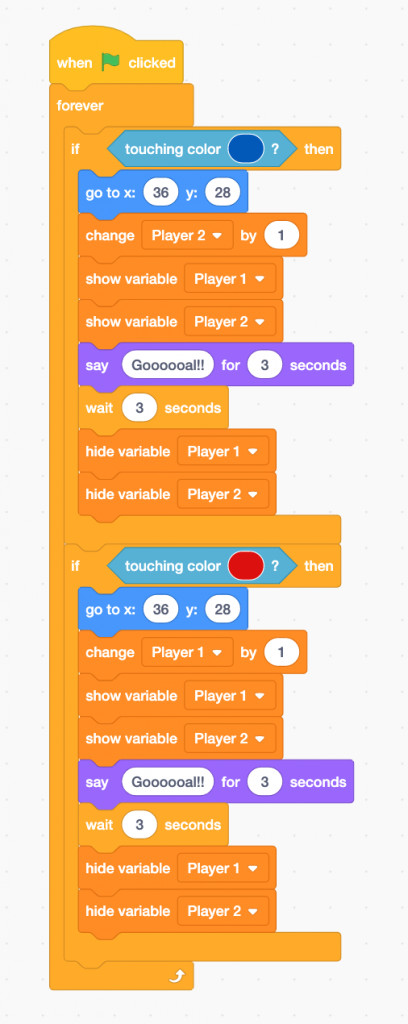 Goal Counting Script
7. Enhancing the Game
To make the game more engaging, you can add additional features such as sound effects, extra players, and AI-controlled goalkeepers.
7.1. Adding Sound Effects
-
Choosing Sounds:
- Go to the “Sounds” tab for the ball sprite.
- Click on “Choose a Sound” from the library.
- Select appropriate sound effects for ball movement, goals, and other actions.
-
Playing Sounds:
- Use “start sound [sound name]” blocks from the “Sound” category in the code.
- Add these blocks to the appropriate sections of the code, such as when the ball touches a player or when a goal is scored.
7.2. Adding More Players
-
Duplicating Sprites:
- Right-click on the player sprites and select “duplicate” to create additional players for each team.
-
Adjusting Movement Scripts:
- Modify the movement scripts for the new players, assigning different keys for control.
-
Team Coordination:
- Implement simple AI for team coordination or allow multiple players to control each team.
7.3. Adding Goalkeepers
-
Creating Goalkeeper Sprites:
- Draw new sprites to represent the goalkeepers.
-
Implementing AI Movement:
- Write scripts for the goalkeepers to automatically move across the goals.
- Use “forever” loops and “if” conditions to control their movement based on the ball’s position.
8. Optimizing the Game for Better Performance
Optimizing your Scratch game ensures smooth gameplay, especially when adding more features and complexity.
8.1. Reducing Script Complexity
-
Simplifying Code:
- Review your scripts and identify areas where you can simplify the code.
- Use custom blocks to encapsulate complex logic and reduce redundancy.
-
Avoiding Overlapping Loops:
- Minimize the number of “forever” loops running simultaneously.
- Use “wait” blocks strategically to prevent excessive CPU usage.
8.2. Using Efficient Blocks
-
Using Built-In Functions:
- Utilize Scratch’s built-in functions and blocks for common tasks.
- Avoid creating custom solutions when a suitable block already exists.
-
Optimizing Collision Detection:
- Use efficient collision detection techniques to minimize performance impact.
- Consider using distance calculations instead of “touching” blocks for complex interactions.
9. Testing and Debugging
Testing and debugging are essential for ensuring your game works as intended.
9.1. Thorough Testing
-
Playtesting:
- Play the game extensively to identify any issues or bugs.
- Test all features, including player movement, ball control, and scoring.
-
User Feedback:
- Get feedback from other users to identify areas for improvement.
- Incorporate their suggestions to enhance the game’s playability.
9.2. Debugging Techniques
-
Using “say” Blocks:
- Use “say” blocks to display variable values and debug information.
- This can help you identify issues with your code and track down bugs.
-
Step-by-Step Execution:
- Use Scratch’s step-by-step execution mode to examine the code’s behavior.
- This allows you to identify the exact location where errors occur.
10. Sharing Your Game
Once you’ve created and tested your game, share it with the Scratch community and beyond.
10.1. Publishing on Scratch
-
Creating an Account:
- Create a Scratch account if you don’t already have one.
-
Saving and Sharing:
- Save your project and click the “Share” button to publish it on the Scratch website.
10.2. Promoting Your Game
-
Adding Instructions:
- Provide clear instructions on how to play the game.
-
Showcasing Features:
- Highlight the game’s features and unique aspects in the project description.
-
Community Engagement:
- Engage with the Scratch community by participating in forums and sharing your game on social media.
FAQ: Making a 2-Player Football Game on Scratch
-
What is Scratch?
- Scratch is a visual programming language designed for beginners to create interactive stories, games, and animations.
-
Why use Scratch for game development?
- Scratch is user-friendly, making it easy to learn programming concepts through a drag-and-drop interface.
-
How do I create a football field in Scratch?
- Use the “Paint” tool in the backdrop editor to draw a green rectangle and add white lines for field markings.
-
How do I add players to my game?
- Draw or choose sprites from the library to represent the players and name them appropriately (e.g., “Player 1,” “Player 2”).
-
How do I control the players’ movements?
- Use “when key pressed” blocks from the “Events” category and “change x by” and “change y by” blocks from the “Motion” category.
-
How do I make the ball move?
- Use “point towards” and “move steps” blocks to make the ball move towards the players when they touch it.
-
How do I keep score in my game?
- Create variables to track each player’s score and update them when a goal is scored.
-
How do I detect when a goal is scored?
- Use “touching color” blocks to detect when the ball touches the goal color and update the score accordingly.
-
How can I enhance my game?
- Add sound effects, extra players, AI-controlled goalkeepers, and other creative features.
-
How do I share my game on Scratch?
- Save your project and click the “Share” button to publish it on the Scratch website.
By following this guide, you’ll be well on your way to creating a fantastic 2-player football game on Scratch. Remember to experiment and have fun with the process!
Are you looking for more detailed answers, personalized guidance, or expert advice on similar topics? Visit CAUHOI2025.UK.COM today to explore our comprehensive resources and connect with experts who can help you further!
Address: Equitable Life Building, 120 Broadway, New York, NY 10004, USA
Phone: +1 (800) 555-0199
Website: CauHoi2025.UK.COM